Discover the Art of Chicken Scratch: A Guide for Beginners
Embroidery and textile art are getting more popular, and Chicken Scratch embroidery is back in style. This might be because of the growing love for gingham fabric1. Beginners can start with the Chicken Scratch Embroidery workshop for just $302. This guide will cover the basics of chicken scratch, including its history, materials, and techniques.
Exploring chicken scratch, you’ll discover various stitches, patterns, and designs. You’ll see how it can make gingham fabric designs beautiful and detailed. The e-book by Laurie Latour is a great resource for learning these techniques3.
Key Takeaways
- You can learn chicken scratch embroidery through workshops like the Chicken Scratch Embroidery workshop, which costs $30 per participant2.
- Chicken scratch embroidery is regaining popularity, possibly due to the current popularity of gingham fabric1.
- The e-book by Laurie Latour provides step-by-step instruction on gingham embroidery techniques and variations3.
- Chicken scratch art and chicken scratch embroidery are terms often used interchangeably.
- You’ll learn about the different stitches, patterns, and designs that make chicken scratch embroidery unique.
- Chicken scratch embroidery can be used to create beautiful and intricate designs on gingham fabric.
What Is Chicken Scratch and Its Origins
Chicken scratch is a style of embroidery from the United States. It’s known for its simple stitches and traditional patterns, often on gingham fabric. The term “chicken scratch” also describes scribbly handwriting or sketching4.
This embroidery style has a long history, dating back to the 1800s. It was especially popular during the Great Depression for its affordability. Now, it’s making a comeback, with a modern twist1.
The term “chicken scratch” also refers to a dance music genre by the Tohono O’odham people5. This music features percussion, guitar, and violin. In the 1950s, the accordion and saxophone were added. The dance involves smooth movements, performed counterclockwise5.
To learn more about chicken scratch, visit this website. It covers the history and evolution of this term. Whether you’re interested in art, embroidery, or music, there’s plenty to explore4.
Essential Materials for Chicken Scratch Embroidery
To start chicken scratch embroidery, you need threads, fabrics, and needles. Perle cotton thread is a top pick for its look6. Gingham cloth, from 1/2″ to 1/16″ micro check, is a classic choice6.
For a real look, use homespun gingham for its coarse feel and square checks6. The right thread weight depends on the gingham size. For example, coton a broder #20 is best for 1/8″ gingham6. Here’s what you need to begin:
- Perle cotton thread
- Gingham cloth in various sizes
- Crewel embroidery needles
- Tapestry needles
- Scissors
- Embroidery hoop
Choosing the right materials is key for a beautiful finish7. With these, you’ll make stunning chicken scratch embroidery and designs.
Follow these tips and use the right materials for stunning chicken scratch projects6. Whether new or skilled, the right tools improve your work quality7.
Understanding Basic Chicken Scratch Patterns
Chicken scratch patterns are key in chicken scratch embroidery. They are essential for making beautiful designs. You use a fine needle to create small patterns in fabric, usually in one color8.
To start, you need to learn about stitches, motifs, and borders. These are the core elements of chicken scratch patterns.
Stitches like cross stitch, double cross stitch, woven circle, and woven oval are used9. You can mix these stitches to make different designs. There are many tutorials and patterns online, including kits and materials for sale10.
Choosing the right fabric and thread is crucial. Gingham fabric is popular for its colors and check sizes9. The thread’s number of strands should match the fabric’s check size9.
- Cross stitch and double cross stitch
- Woven circle and woven oval
- Simple stitches, such as dashes and loops
Learning these basic patterns and techniques will help you create stunning chicken scratch designs. It’s a rewarding traditional craft8.
| Pattern | Stitches | Fabric |
|---|---|---|
| Simple Cross Stitch | Cross stitch, double cross stitch | Gingham |
| Woven Circle | Woven circle, woven oval | Gingham or checked fabric |
Selecting the Right Fabric and Thread
Choosing the right fabric and thread is key for chicken scratch embroidery. Gingham fabric is a top pick, available in sizes from 1/2″ to 1/16″ micro check fabric6. The check size affects the design’s detail.
For chicken scratch technique, perle cotton thread is best. It comes in many colors and weights11. The thread’s weight depends on the check size and texture you want.
The chicken scratch font also matters. A bold font contrasts well with gingham fabric10. Pick a font that fits your fabric and thread.
Here are tips for picking the right fabric and thread for your chicken scratch embroidery:
- Choose a gingham fabric that fits your design
- Select perle cotton thread that matches your fabric
- Use a chicken scratch font that complements your fabric and thread
Follow these tips and use the right materials. You’ll make a stunning chicken scratch embroidery piece that shows off your skills6.
| Fabric Type | Thread Weight | Font Style |
|---|---|---|
| Gingham | Perle cotton #3 or #5 | Simple, bold font |
| Muslin | Coton a broder #20 | Intricate, cursive font |
Mastering Fundamental Chicken Scratch Techniques
To master the chicken scratch technique, you need to learn the basic stitches and practice often. A chicken scratch tutorial is a great way to start. Using a chicken scratch pen can help you make even stitches.
Common stitches in chicken scratch embroidery include the cross stitch and double cross stitch. You can also use woven circle and woven oval stitches. To make double lines and borders, mix these stitches. Here are some tips to get you started:
- Use the right materials and tools, such as cotton gingham print, embroidery floss, and a crewel embroidery needle.
- Practice the basic stitching methods before moving on to more complex patterns.
- Watch online tutorials or take a class to learn from experienced instructors12.
Remember to be patient and take your time when mastering the chicken scratch technique. With practice and dedication, you can create beautiful designs. You can find more information and resources online12.
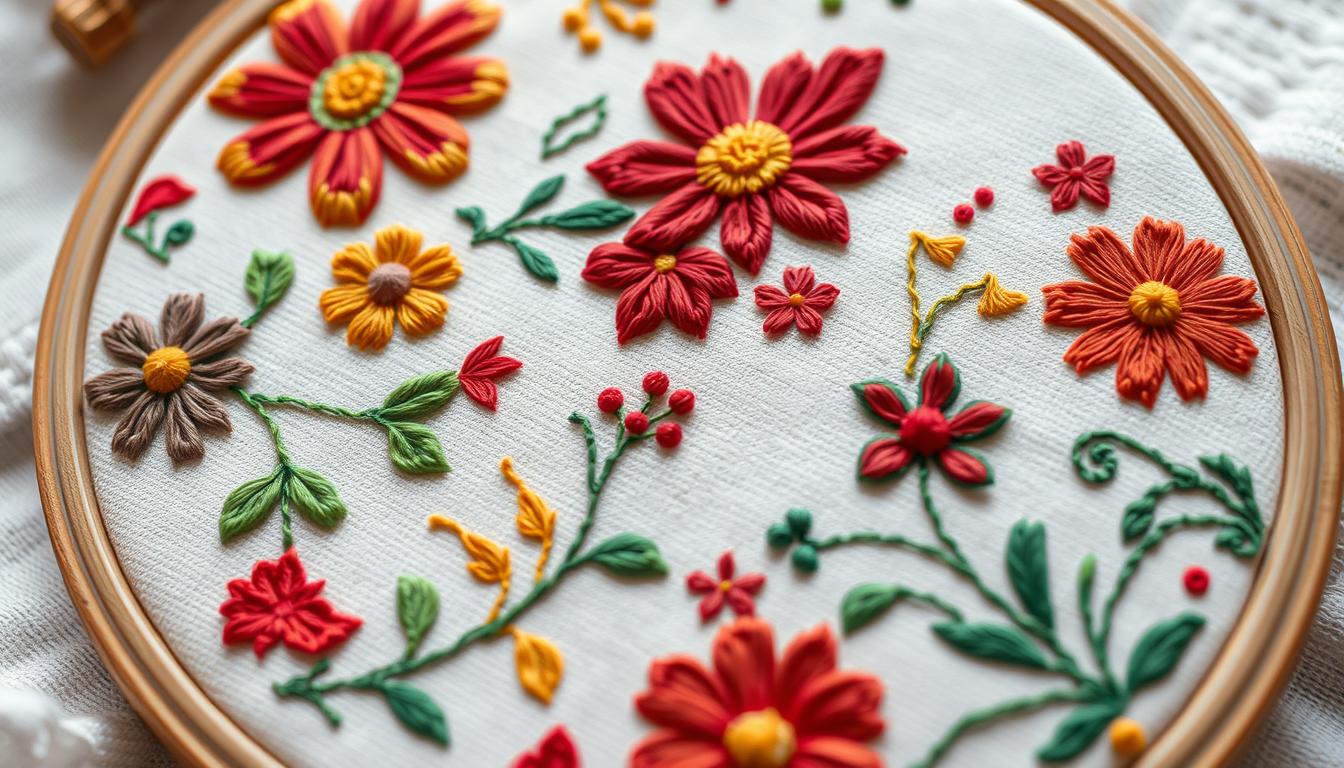
Popular Chicken Scratch Designs for Beginners

There are many chicken scratch designs to pick from, like floral, geometric, and whimsical patterns13. You can find lots of ideas on Pinterest. It’s full of chicken scratch patterns for your next project14.
Popular items made with chicken scratch art include aprons, pillows, and bookmarks13. To start, try Cross-Stitch, Double Cross-Stitch, and Running Stitch13. You can also find free patterns and guides on Muddlepud14.
Here are some tips for picking the right chicken scratch design for your project:
- Think about the fabric you’ll use
- Pick a pattern that matches your skill level
- Play with different stitches and colors
Remember, have fun and be creative with your chicken scratch art projects14. With practice and patience, you can make beautiful, unique pieces that show off your skills and style.
| Project | Materials Needed | Stitches Used |
|---|---|---|
| Bookmark | 1/4″ check gingham, white embroidery floss, embroidery hoop, needle, 6″ ribbon | Cross-Stitch, Double Cross-Stitch, Running Stitch, Woven Oval Stitch |
Troubleshooting Common Chicken Scratch Challenges
Working on chicken scratch embroidery can sometimes be tough. You might face issues like uneven stitches or fabric tension problems. To fix these, it’s key to know the common problems and how to solve them. Uneven stitches can be fixed by using the right chicken scratch technique and adjusting your tension15.
Fabric tension can make your stitches look bad. To solve this, mark your fabric with a chicken scratch pen to keep tension even. Also, using a hoop or frame helps keep your fabric tight, making your work easier16.
Thread tangles can be really annoying. To untangle threads, use a thread conditioner or a small brush. It’s also good to store your threads right to avoid tangles. For more on chicken care, check out chicken care resources and learn about balanced diets17.
Here are some tips to help you troubleshoot common chicken scratch challenges:
- Use the right materials and tools, such as a chicken scratch tutorial or a chicken scratch pen, to help you achieve even stitches and tension.
- Practice regularly to develop your skills and build your confidence.
- Join a community of chicken scratch enthusiasts to learn from others and share your own experiences.
By following these tips and using the right techniques, you can overcome common chicken scratch challenges and create beautiful embroidery projects. Always use high-quality materials and tools. Don’t be afraid to try new things15.
| Challenge | Solution |
|---|---|
| Uneven stitches | Adjust tension and use the right technique |
| Fabric tension | Use a hoop or frame and mark fabric with a chicken scratch pen |
| Thread tangles | Use a thread conditioner and store threads properly |
Modern Applications of Chicken Scratch Art
Chicken scratch art has grown in popularity, with many creative uses today. You can see chicken scratch embroidery on clothes, accessories, and home decor. Its unique designs make it a favorite for those wanting something special.
This art form is very versatile. You can make detailed designs on fabric, paper, or wood. The chicken scratch designs can mix with painting or drawing for unique pieces. It’s great for both experienced artists and beginners.
Some modern uses of chicken scratch art include:
- Creating custom clothing and accessories, such as embroidered shirts or decorative patches
- Designing home decor items, like embroidered pillows or wall hangings
- Making personalized gifts, such as customized picture frames or ornaments
Chicken scratch art is not just beautiful; it’s also meaningful. It can share stories, emotions, or add elegance to any project. With its rich history and modern uses, it’s perfect for exploring creativity. You’ll find endless possibilities, from traditional chicken scratch embroidery to modern chicken scratch designs18.
By trying different materials, techniques, and designs, you can make unique and beautiful chicken scratch art. Whether you like traditional or modern styles, the options are endless. So, why not try chicken scratch art and enjoy creating something special19?
Tips for Creating Your Own Chicken Scratch Patterns

Creating your own chicken scratch patterns involves design principles like color, texture, and composition. Use pattern charts and software to plan your design. This helps you see your pattern before stitching6. says chicken scratch embroidery is great for all skill levels, from beginners to experts.
First, pick the right fabric and thread for your project. Gingham fabric is popular for chicken scratch embroidery. You can use different check sizes to achieve different effects. For example, larger checks are better for kids, while adults can use smaller ones6. suggests using coton a broder #20 for smaller gingham or perle cottons for larger checks.
Design Principles
When designing, think about balance, proportion, and harmony. Use colors and textures to create a balanced design. For instance, mixing light and dark threads can make a stunning design11. Also, try different stitches like the Double Cross Stitch to add texture11.
Pattern Planning Tools
There are many tools for planning chicken scratch patterns, like pattern charts and software. These tools help you visualize and adjust your design before stitching. Graph paper, stitch guides, and embroidery software are popular choices20.
By following these tips and using the right tools, you can make unique chicken scratch patterns. Remember to focus on design principles like color, texture, and composition. With practice, you can create beautiful designs that show off your skills and creativity.
| Tool | Description |
|---|---|
| Graph Paper | Used to create and plan chicken scratch patterns |
| Stitch Guides | Provide instructions and diagrams for different stitches |
| Embroidery Software | Allows you to design and edit chicken scratch patterns digitally |
Maintaining and Caring for Your Chicken Scratch Projects
To keep your chicken scratch embroidery projects looking great, it’s key to care for them right. Use acid-free materials and frames that are made for keeping things safe over time21. For cleaning, you can hand wash or dry clean, depending on what your project is made of22.
For chicken scratch art pieces, be gentle to avoid damage. Use a soft brush to clean off dust or dirt23. Keep your projects out of sunlight and away from moisture to stop fading or color change.
Here are some tips for keeping your chicken scratch designs in top shape:
- Use acid-free materials and archival-quality framing
- Handle projects with care to avoid creasing or tearing
- Keep projects away from direct sunlight and moisture
- Use gentle hand washing or dry cleaning methods for cleaning
By following these tips, your chicken scratch embroidery projects will stay beautiful and bright for years21. Always be careful with your projects and protect them from harm22. With the right care, you can enjoy your chicken scratch art and chicken scratch designs for a long time23.
Taking Your Skills to the Next Level
To improve your chicken scratch technique, try out advanced patterns and mix different stitches. You can find many chicken scratch tutorials online, including videos and step-by-step guides24. A chicken scratch pen can also help you make more detailed designs.
Here are some ways to boost your skills:
- Try new stitches and patterns
- Combine embroidery and quilting techniques
- Use a chicken scratch pen for detailed designs
For professional growth, check out online courses on continuous professional development. These can help you learn new skills and keep up with trends25. Always practice and be patient as you get better at chicken scratch.
Conclusion: Your Journey into Chicken Scratch Artistry
As you end your journey into chicken scratch art, enjoy the joy and creativity it brings. You might have learned the basics or explored more complex techniques. The beauty of chicken scratch is in its flexibility and your unique style26.
The real beauty of chicken scratch art is the journey, not just the end result. Take your time with each stitch. Try out different patterns and colors. Let your imagination run wild. The process is as rewarding as the finished piece27.
Keep improving your skills and find new ideas. Connect with others who love chicken scratch. Try more challenging designs. This art form grows with you, adapting to your style26.
Let chicken scratch art bring you joy and relaxation. It’s a way to express yourself. Your adventure in this craft is just starting. Enjoy every stitch and let your creativity fly27.
FAQ
What is chicken scratch and where does it come from?
What materials are needed for chicken scratch embroidery?
What are the basic patterns and techniques used in chicken scratch embroidery?
How can I create my own chicken scratch patterns?
What are some of the challenges I might face when working on chicken scratch embroidery?
How can I take my chicken scratch embroidery skills to the next level?
How do I maintain and care for my chicken scratch embroidery projects?
Source Links
- https://www.needlenthread.com/2014/04/chicken-scratch-gingham-embroidery-index.html – Chicken Scratch / Gingham Embroidery Index – & some history
- https://www.pasadenanow.com/weekendr/pasadena-based-remainders-creative-reuse-invites-you-to-rediscover-chicken-scratch-embroidery/ – Pasadena-based Remainders Creative Reuse Invites You to Rediscover Chicken Scratch Embroidery
- https://www.needlenthread.com/2011/06/guide-to-gingham-embroidery.html – Guide to Gingham Embroidery … or … errr … Chicken Scratch!
- https://boards.core77.com/t/chicken-scratch-and-other-coloquial-terms/18847 – Chicken Scratch and other Coloquial Terms
- https://en.wikipedia.org/wiki/Chicken_scratch – Chicken scratch
- https://www.needlenthread.com/2014/04/how-to-embroider-on-gingham-chicken-scratch-tutorial.html – How To Embroider on Gingham – Chicken Scratch Tutorial
- https://www.embroidery.rocksea.org/hand-embroidery/chicken-scratch/ – Chicken Scratch – Sarah’s Hand Embroidery Tutorials
- https://needlework.craftgossip.com/15-chicken-scratch-embroidery-tutorials/2023/07/03/ – 15 Chicken Scratch Embroidery Tutorials – Needle Work
- https://embroiderersguild.com/chicken-scratch/ – Chicken Scratch – Embroiderers’ Guild
- https://www.stitchesquilting.com/chicken-scratch-embroidery-tutorial/ – Chicken Scratch Embroidery Tutorial • Stitches Quilting
- https://www.quiltscapesqs.com/2014/04/chicken-scratch-anyone.html – Hand Stitchery: Chicken Scratch Embroidery!
- https://tatter.org/events/world-embroidery-series-2/ – World Embroidery Series III: a six week exploration – Tatter
- http://kerrimade.blogspot.com/2008/04/chicken-scratch-bookmarks-tutorial.html – Chicken Scratch Bookmarks Tutorial
- https://www.pinterest.com/ideas/chicken-scratch-embroidery/933535187539/ – Chicken Scratch Embroidery
- https://www.aces.edu/blog/topics/farming/common-backyard-chicken-behaviors/ – Common Backyard Chicken Behaviors – Alabama Cooperative Extension System
- https://dineachook.com/blog/how-to-feed-your-chickens-scratch-grains/?srsltid=AfmBOoomumBvOdAMLTe4oytqvhp9GOuN2DrnTfMoZQdMneMHZJM9-5Wf – How To: Feed Your Chickens Scratch Grains
- https://www.agriculture.com/family/living-the-country-life/10-poultry-problems – 10 Poultry Problems and Solutions
- https://rightbooks4kids.substack.com/p/chicken-scratch-put-to-the-test – Chicken Scratch Put to the Test
- https://blog.gingerburrell.com/tag/chicken-scratch/ – chicken scratch – Midnight Musings
- https://blog.papertreyink.com/2015/03/introducing-chicken-scratch/ – Introducing Chicken Scratch
- https://www.farmhouseonboone.com/how-to-care-for-backyard-chickens/ – How To Take Care Of Chickens
- https://thehomesteadingrd.com/how-to-care-for-chickens/ – How to Care for Chickens: A Beginners Guide
- https://opensanctuary.org/chicken-diet-and-supplements/ – Daily Diet, Treats and Supplements for Chickens – The Open Sanctuary Project
- https://www.needlenthread.com/2014/04/whats-in-a-name-a-chicken-scratch-argument.html – What’s in a Name? A Chicken Scratch Argument
- http://www.kirijorgensen.com/chicken-scratch.html – Chicken Scratch
- https://riverandsouth.com/chicken-scratch-by-therese-white/ – Chicken Scratch – River & South Review
- https://medium.com/@oddinaustin/how-i-used-claude-3-5-to-decipher-my-chicken-scratch-and-discover-my-true-self-15ef2be35c1e – How I Used Claude 3.5 to Decipher My Chicken Scratch and Discover My True Self
Related Post

Best Dog Eye Wipes for Safe & Gentle Pet Care
Did you know that over 75% of dog owners face issues with tear stains or [...]
Can Chickens Eat Onions? Learn the Facts
Curious if chickens can eat onions? Discover the facts and learn what to feed your [...]